Clustering Keyword Otomatis: 7 Langkah Menjalankan Scriptnya
Man-teman pembaca setia kumiskiri! Udah pada tau belum, sekarang lagi ngetren banget nih, ada skrip keren buat nge-cluster kata kunci! Namanya? Clustering Keyword dengan BERTopic! Jadi gini, skrip ini bikin hidup lu lebih asik pas riset keyword.
Jadi intinya, ane bakal bahas cara jalanin script clustering keyword yang bikin ente hemat waktu, tapi juga dapetin hasil yang oke punya. Yok, cekicrot!
Syarat Wajib Jalanin Clustering Keyword
Sebelum ane bahas yang serius-serius, ada beberapa syarat yang wajib ente penuhi dulu, nih. Penting banget, loh! Kalo mau hasil maksimal, pastiin dulu ente udah selesaiin proses cek similarity gratis. Kalo udah selesai? Ok, ente bisa lanjut ke proses selanjutnya. Keep reading, man-teman!
Langkah Menjalankan Script Clustering Keyword
Sekarang, ane bakal masuk ke pembahasan yang agak serius nih, gimana cara jalanin script clustering keyword. Jadi, biar ente bisa fokus, siapin dulu minuman dan camilan kesukaan ente, ya. Let’s dive in, man-teman!
Langkah 1: Siapin Unik Keyword
Nah, penting banget! Ini tuh alasan kenapa ane minta ente-ente semua selesaiin proses cek similarity gratis. Buat apa? Biar ente dapetin unik keyword, gitu lho. Jadi, yang udah dapetin unik keyword, lanjut ke langkah berikutnya. Buat yang belum, jangan males-malesan, selesain dulu! Hukumnya Wajib!
Tambahan nih: Kalo ente perhatiin, pas ente cek similarity, hasil download keyword yang ente dapatin dikasih nama “unique_keywords.csv”, ente tinggal ganti aja jadi “keywords”. Simple, kan? Ok, lanjut ke langkah clustering keyword yang kedua.
Langkah 2: Upload Unik Keyword
Supaya bisa upload keyword unik, ente perlu bantuan Google Colab. Sekarang, buka Google Colab, terus masukin script yang udah ane sediain. Copy-paste aja, gampang kan?
from google.colab import files
import os

# Clear any existing files
!rm -f keywords.csv

# Upload new file
uploaded = files.upload()

# Get the name of the uploaded file
uploaded_file_name = next(iter(uploaded))

# Check if the file uploaded correctly and is a CSV
if not uploaded_file_name.lower().endswith('.csv'):
raise ValueError("Please upload a CSV file.")

# Rename the uploaded file
os.rename(uploaded_file_name, 'keywords.csv')

print("Uploaded file renamed to 'keywords.csv'")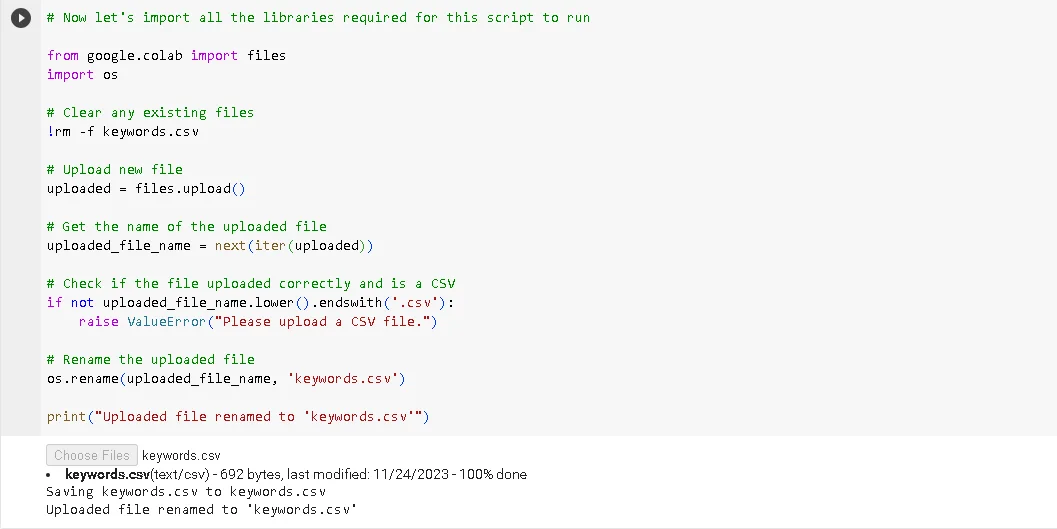
Langkah 3: Bikin File Konfigurasi
Script clustering keyword yang bakal ente masukin kali ini buat import semua modul yang dibutuhin sistem biar jalan lancar. Nah, di langkah ini, ente juga perlu ubah beberapa parameter, namanya “language”.
Catatan: Ane targetin keyword pake bahasa Indonesia, jadi ane ubah “language” jadi “indonesian”. Kalo ente targetin bahasa Prancis, misalnya, ente bisa ganti ke “french”. Kalo bingung, cek aja di metatext, dijelasin lengkap kok. Biar nggak bingung, begini cara ubahnya:
ctrl + f -> ketikin “language”: “indonesian” -> Ubah bahasa
import json

config = {
"file_path": "keywords.csv",
"output_excel_file": "clustered_keywords.xlsx",
"outliers_excel_file": "outliers.xlsx",
"min_cluster_size": 5,
"language": "indonesian",
"calculate_probabilities": False
}

# Clear any existing files
!rm -f config.json

# Here you write the config to a json file, or you can just use the dictionary directly
with open('config.json', 'w') as config_file:
json.dump(config, config_file)

print("Config file created.")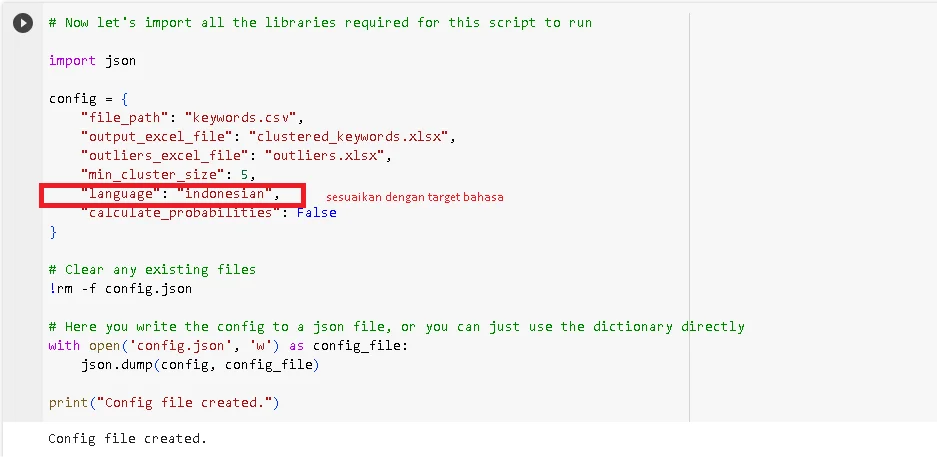
Langkah 4: Install Perpustakaan Python
Jadi, script clustering keyword ini tuh dijalankan pake bahasa pemrograman Python, sistem butuh install perpustakaannya. Jadi, masukin script ini, ya.
!pip install pandas bertopic openpyxl tqdm seaborn

Langkah 5: Import Terus Deteksi Tiap Kata di Keyword
Pada langkah clustering keyword kali ini, ente bakal mengimpor semua perpustakaan Python yang dibutuhin, terus dilanjutin dengan proses deteksi tiap kata di keyword yang udah ente upload. Langsung aja masukin scriptnya:
import pandas as pd
from bertopic import BERTopic
from openpyxl import Workbook
from openpyxl.styles import PatternFill
from openpyxl.utils import get_column_letter
import logging
from logging.handlers import RotatingFileHandler
import json
from tqdm.auto import tqdm
import datetime
import seaborn as sns

# Set up logging
logger = logging.getLogger(__name__)
logger.setLevel(logging.INFO)
console_handler = logging.StreamHandler()
file_handler = RotatingFileHandler('clustering_with_bertopic.log', maxBytes=10485760, backupCount=3)
logging_format = logging.Formatter('%(asctime)s - %(levelname)s - %(message)s')
console_handler.setFormatter(logging_format)
file_handler.setFormatter(logging_format)
logger.addHandler(console_handler)
logger.addHandler(file_handler)

# Load configuration
def load_config(config_path='config.json'):
with open(config_path) as config_file:
config = json.load(config_file)
return config

# Load the dataset
def load_data(file_path):
df = pd.read_csv(file_path, header=None, names=['keywords'])
return df['keywords'].tolist()

# Preprocessing the keywords
def preprocess_keywords(keywords):
tqdm.pandas(desc="Preprocessing Keywords")
return keywords.progress_apply(lambda x: x.lower().strip())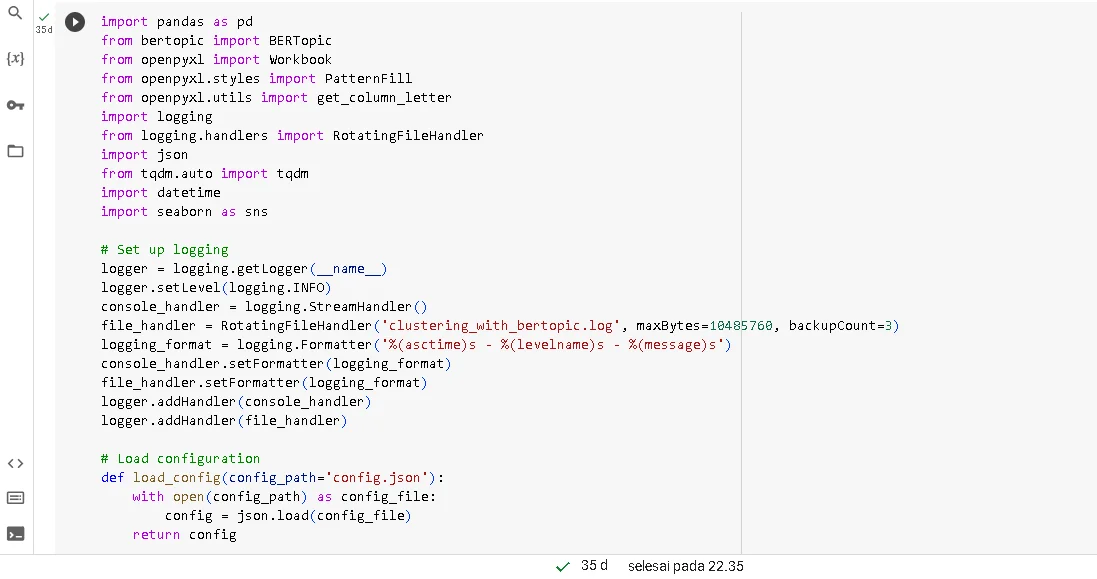
Langkah 6: Pemodelan BERTopic
Nah, berhubung script ini pake teknik pemodelan BERTopic, ente bakal langsung eksekusi scriptnya berdasarkan tiap kata di keyword yang udah dideteksi, terus di-cluster secara otomatis sesuai algoritma BERT.
Catatan: Di tahap ini, ente juga perlu ubah target bahasa sesuai kebutuhan. Caranya gini:
ctrl + f -> ketikin language=config.get(‘language’, ‘indonesian’) -> Ubah bahasa
def perform_topic_modeling(keywords, config):
model = BERTopic(min_topic_size=config.get('min_cluster_size', 5),
language=config.get('language', 'indonesian'),
calculate_probabilities=config.get('calculate_probabilities', False),
verbose=True)
topics, _ = model.fit_transform(keywords)
return topics, model

# Save results to Excel, separated by identified topics and outliers
def save_to_excel(df, file_path, outliers_file_path):
# Split the DataFrame into topics and outliers
df_topics = df[df['group'] != -1].sort_values('group')
df_outliers = df[df['group'] == -1]

# Save the topics to Excel, with grouping and coloring
wb_topics = Workbook()
ws_topics = wb_topics.active
ws_topics.append(["Keyword", "Group"]) # Add column headers

# Apply color to each cell based on the topic with a maximum of 20 colors
max_colors = 20
colors = sns.color_palette("hsv", max_colors).as_hex()

grouped = df_topics.groupby('group')
row_index = 2
for group, data in grouped:
topic_color = colors[group % max_colors]
fill = PatternFill(start_color=topic_color[1:], end_color=topic_color[1:], fill_type='solid')
for _, row in data.iterrows():
ws_topics.append([row['keyword'], row['group']])
cell = ws_topics.cell(row=row_index, column=2)
cell.fill = fill
row_index += 1

# Adjust the column widths
for column_cells in ws_topics.columns:
length = max(len(str(cell.value)) for cell in column_cells)
ws_topics.column_dimensions[get_column_letter(column_cells[0].column)].width = length

wb_topics.save(file_path)

# Save the outliers to a separate Excel file
wb_outliers = Workbook()
ws_outliers = wb_outliers.active
ws_outliers.append(["Keyword"]) # Add column header for outliers
for _, row in df_outliers.iterrows():
ws_outliers.append([row['keyword']])

wb_outliers.save(outliers_file_path)

# Main function to run topic modeling
def main():
config = load_config()

try:
# Load data
keywords = load_data(config['file_path'])
preprocessed_keywords = preprocess_keywords(pd.Series(keywords))

# Perform topic modeling
labels, topic_model = perform_topic_modeling(preprocessed_keywords, config)

# Save the clustered data
df_clustered = pd.DataFrame({'keyword': preprocessed_keywords, 'group': labels})
save_to_excel(df_clustered, config['output_excel_file'], config['outliers_excel_file'])

logger.info("Topic modeling completed and results saved.")

except Exception as e:
logger.exception("An error occurred during topic modeling.")
raise

if __name__ == "__main__":
main()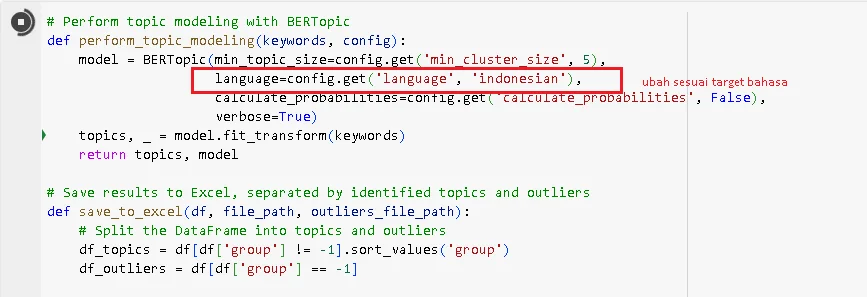
Langkah 7: Simpen File Hasil Clustering Keyword
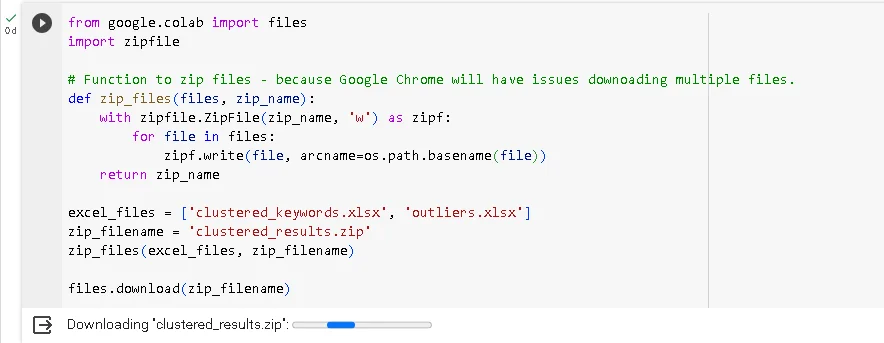
Kalo proses pemodelan BERTopic udah selesai, langkah terakhir yang perlu ente lakuin adalah masukin script buat simpen file yang udah di hasilin. Jadi, nantinya ente bakal dapetin dua file, namanya “clustered_keywords.xlsx” sama “outliers.xlsx”.
from google.colab import files
import zipfile

# Function to zip files - because Google Chrome will have issues downoading multiple files.
def zip_files(files, zip_name):
with zipfile.ZipFile(zip_name, 'w') as zipf:
for file in files:
zipf.write(file, arcname=os.path.basename(file))
return zip_name

excel_files = ['clustered_keywords.xlsx', 'outliers.xlsx']
zip_filename = 'clustered_results.zip'
zip_files(excel_files, zip_filename)

files.download(zip_filename)
Catatan Lagi: Antisipasi kalo scrips yang ane taruh disitus ini ada kesalahan alias error, ente bisa clomot Backup Script.
Gimana man-teman pembaca setia kumiskiri? Buat jalanin script clustering keyword itu, gampang banget, kan. Nggak cuma bikin ente hemat waktu, tapi ente juga dapet hasil clustering keyword yang akurat. Oke cukup gitu aja deh man-teman, mudah-mudahan bisa kasih manfaat dan Selamat mencoba,man-teman pembaca setia kumiskiri!
Sumber: Keyword Clustering
