Cara Membuat Script Auto Post dari ChatGPT ke WordPress
Pernah nggak ngerasa repot banget, pas mau mindahin konten dari ChatGPT ke WordPress? Nah, kalo ente-ente semua ngerasa kerepotan! Pas banget nih, ane bakal ngupas tuntas Script Auto Post yang bisa bantu ente mindahin konten secara otomatis dari ChatGPT ke WordPress lewat bantuan Google Colab.
Nah, buat yang nggak terlalu jago koding kayak ane, tenang! langkah-langkah yang bakal ane jelasin ini gampang banget buat di praktekin. Ente-ente semua tinggal copas aja script yang udah ane siapin, masalah selesai deh. Gak usah lama-lama, langsung aja cekicrot!
Sedot Aja Nih Script Auto Post
Langkah pertama yang ente butuhin tuh, harus punya Scriptnya dulu. Script ini tuh bisa ente gunain buat posting konten dari ChatGPT ke WordPress secara otomatis. Kalo udah punya script ini, ente bisa otomatisasi konten tanpa ribet plus nggak perlu lagi pake plugin tambahan atau software aneh-aneh.
Jadi, sebelum ente jalanin aksi otomatisasi yang bakal mindahin konten dari ChatGPT ke WordPress, hal pertama yang harus ente lakuin yaitu copas aja Script Auto Post-nya. Ingat, jangan sampe ente nggak bisa nemuin tombol “copy”!
!pip install openai --quiet
import openai
import os
openai.api_key = "isi dengan open ai key"

def make_post(the_title,the_text,your_user,your_password,your_site,wordpress_category):
import requests
import base64
your_credentials = your_user + ":" + your_password
your_token = base64.b64encode(your_credentials.encode())
your_header = {'Authorization': 'Basic ' + your_token.decode('utf-8')}

api_url = your_site+'/wp-json/wp/v2/posts'
if not wordpress_category == "":
data = {
'title' : the_title,
'status': 'publish',
'content': the_text,
'categories': 3
##'slug' : 'example-post',
}
else:
data = {
'title' : the_title,
'status': 'publish',
'content': the_text,
}

response = requests.post(api_url,headers=your_header, json=data)
return response.json()

def gpt_chat(all_params):
the_keyword,the_prefix,the_temperature,the_max_tokens = all_params
the_text = the_prefix + the_keyword + ":"
#the_text = the_prefix + the_text
response = openai.ChatCompletion.create(
model="gpt-3.5-turbo",
messages=[{"role": "user", "content": the_text}],
temperature=the_temperature,
max_tokens=the_max_tokens
)

the_result = response["choices"][0]["message"]["content"]

return the_result

def fix_ahrefs_keywords(file_with_keywords):
with open(file_with_keywords, 'r') as fyl:
lines = fyl.readlines()

good_lines = []
for aline in lines:
aline = aline.strip()
if (not any(str.isdigit(x) for x in aline) or len(aline.split())>3) and not aline.strip()=="" and not "Sign up" in aline and not "N/A" in aline:
good_lines.append(aline)

with open(file_with_keywords, 'w') as f:
for line in good_lines:
f.write(f"{line}\n")

#load file with your keywords

file_with_keywords = "sample_data/keywords.txt"
fix_ahrefs_keywords(file_with_keywords)

# SETTINGS

begin_index = 0
end_index = 100
your_site = "yur site url"
your_user = "your site username"
your_password = "isi dengan new app pasword wordpress"
wordpress_category = "SEO" # or you can add here a category id
title_is_keyword = "yes" #cam be "yes" or "no". If yes then the title is the keyword, if no then the title is created by GPTCHAT
remove_ai_detection = "no"

#prefix = "Write an article about"

prefix = "Write a very extremelly long and detailed article about "

#load the fixed keywords
with open(file_with_keywords, 'r') as fyl:
keywords = fyl.readlines()
keywords = [x.strip() for x in keywords]

#now we create posts using GPT-chat and post them to our wordpress site

for e,akeyword in enumerate(keywords):

if e<begin_index or e>=end_index:continue #this makes sure we only add article from begin to end
the_temperature = 0.7
the_max_tokens = 2000
all_params = akeyword,prefix,the_temperature,the_max_tokens
print("we are writing post #",e,", using keyword:",akeyword)
gptchat_article = gpt_chat(all_params)
title = akeyword.title()
import time
time.sleep(20)
try:
gptchat_article_list = gptchat_article.split("\n")
if gptchat_article_list[0].count(".")<=1 and gptchat_article_list[1].strip()=="":
title = gptchat_article_list[0]
gptchat_article = gptchat_article.replace(title,"").strip()
if title_is_keyword=="yes":
title = akeyword.title()
except:pass

#now we post to out wordpres site

try:
the_response = make_post(title,gptchat_article,your_user,your_password,your_site,wordpress_category)
the_link = the_response['guid']['rendered']
print("the_link",the_link,"word count",len(gptchat_article.split()),"the_title:",title)
except Exception as err:
print("we have an error",err)
Antisipasi jika terjadi error atau hal buruk lainya, ente-ente semua bisa clomot Backup Script
Cara Jalanin Script Auto Post dari ChatGPT ke WordPress
Scriptnya udah ente copas semua kan? Nah, selanjutnya, ente bakal melewati fase yang lebih kompleks lagi. Ente bakal perlu bawa-bawa Script Auto Post ini masuk ke situs WordPress, semuanya pake bantuan ajaib lagi, yaitu Google Collab.
Baca Juga: 3 Cara Membuat Artikel dari Video Youtube dengan ChatGPT
Langkah 1: Buat Project di Google Colab
Buka Google Colab, terus, ente langsung aja impor semua modul yang dibutuhin buat jalanin Script Auto Post buatanya Om Moonlight sama Om Sunlight. Nah, hasil copas script diatas tinggal ente paste in aja. Biar makin jelas ane contohin kayak gambar:
Login Google Colab -> Notebook Baru
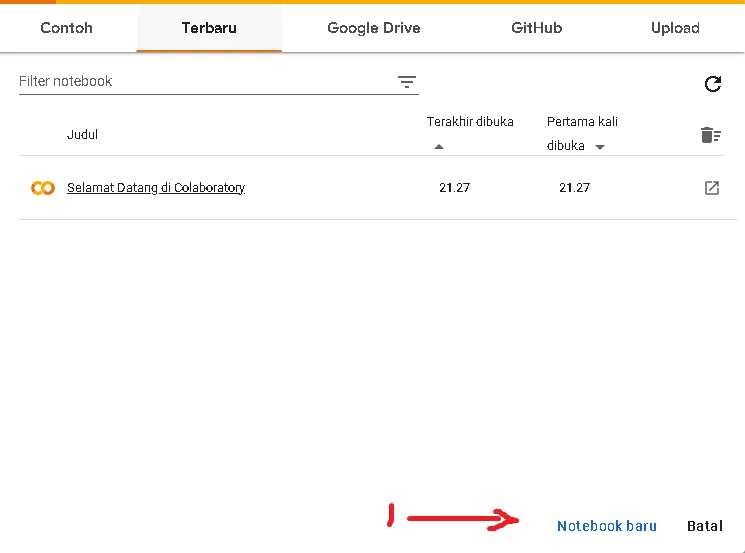
Kalo udah ente klik Notebook baru, nanti bakal muncul tampilan tab baru, terus ente tinggal masukin aja script yang udah ente copas diatas.

Langkah 2: Siapin Aplication Password Sama API Keys
Sebelum mulai, pastiin dulu ente punya akun WordPress yang masih valid. Kalo ente belum punya, tinggal bikin aja kok. Nah, kalo akunnya udah siap, ente juga perlu bikin aplikasi sandi (application password) di akun WordPress. Soalnya, ente bakal butuh username dan aplikasi sandi itu di dalam script.
Login WordPress -> User -> All User -> Edit -> Aplication Passwords -> Isi New Aplication Password Name -> Klik Add New Aplication Password
Tinggal ente simpen aja tuh password wordpress yang ente dapetin. Terus, ente lanjut buat kredensial API Keys Openai. Gini caranya dapetin API Keys nya:
Login Openai -> API -> Klik Personal Pojak kanan Atas -> View API Keys -> Create New Secret Key
Aplication password sama API keys ChatGPT udah ente dapetin nih. Terakhir, ente perlu masukin ke dalam scriptnya. Terus ketikin aja parameter kode kayak contoh gambar:
Ctrl + F -> Ketik kode openai.api_key

CTRL + F -> Ketik kode # SETTINGS

- your_site -> Isi pake alamat situs web atau blog ente
- your_user -> Isi pake nama users wordpress ente, ini beda sama username pas buat login ke WP
- your_password -> Masukin hasil generate application password yang udah ente buat
Catatan: Biar prosesnya makin lancar, ente perlu pastiin kalo fungsi XMLRPC wordpress ente aktif. Cara gampang, ketikin aja nama_domain_ente.com/xmlrpc.php, kalo muncul info “Server XML-RPC accepts POST request only” tandanya aktif, kalo nggak muncul statusnya nonaktif
Langkah 3: Setting Keywords Sama Konten
Masih fokus di script auto post, nanti ente bakal diminta buat masukin keyword atau topik yang bakal ente jadikan konten. Selain itu, ente juga bisa ngatur apakah kontennya bakal langsung di publish atau dijalanin dulu sebagai draft. Gak cuma itu, script ini juga bisa ngatur detail lainnya, kayak kategori dan tag.
Tugas pertama yang harus ente lakuin buat file baru di dalam folder google colab terus dikasih nama keywords.txt. Isi file baru ini pake keyword-keyword yang udah ente targetin buat bikin konten. Biar jelas gini alur kerja sama contoh gambarnya:
Google Colab -> Klik Icon Folder -> Klik File Baru -> Kasih Nama keywords.txt
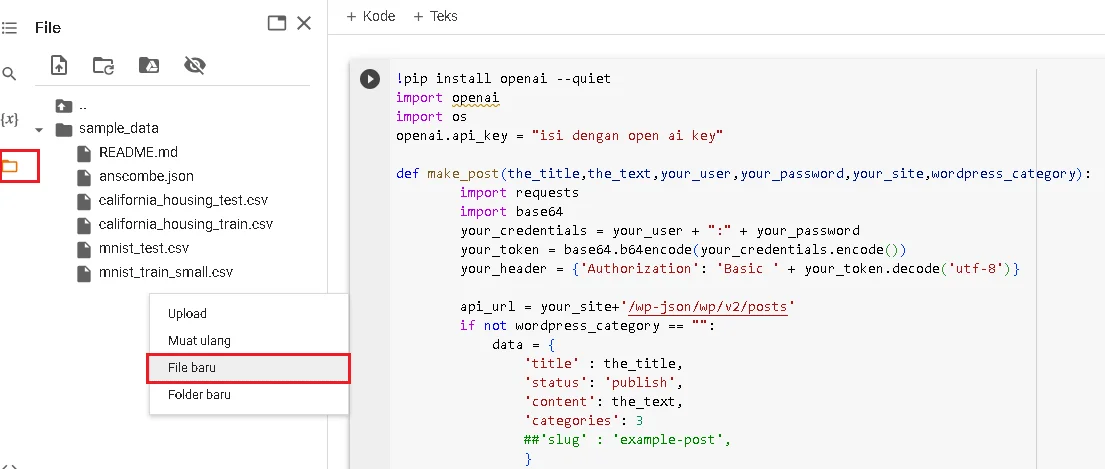
Keywords.txt udah ente isi nih! Selanjutnya, ente perlu setting beberapa parameter kode script auto post nya biar konten yang di hasilin nanti makin uye syalala.
- ‘status’ -> Kalo selesai generate langsung pengen di posting ente ganti jadi ‘publish‘. Nah, kalo gak mau lagsung di posting tinggal ganti aja jadi ‘draft’. Ane saranin ubah ke draft aja biar nggak dikira spam.
- ‘categories’ -> Ubah aja pake angka sesuai jumlah kategori yang mau ente masukin
- begin_index -> Buat nentuin nilai awal input keyword pas mau generate, ente isi aja pake angka 0
- end_index -> Nentuin nilai akhir jumlah keyword, misal ente masukin 100 keywrods tulis aja 100
- wordpress_category -> Generate artikel per kategori, misal keyword yang dimasukin bahas soal wordpress buat aja jadi “wordpress”
- title_is_keyword -> Judul postingan artikel, kalo ente mau judul artikel sesuai keyword yang ente input ubah jadi “yes”. Sebaliknya, kalo ente pengen judul artikel otomatis dibuat sama ChatGPT ente ganti jadi“no”. Ane saranin, kondisi “yes” ente terapin kalo pas targetin longtail keyword, kalo nggak “no” aja.
- time.sleep -> Buat nentuin jeda waktu postingan, ente atur aja sesuai keinginan ente.
Udah ngertikan sekarang? Kalo udah, nggak usah pake lama-lama langsung aja ente-ente semua eksekusi. Gini caranya:
CTRL + F -> ketikin 'status' -> ubah kotak tiap kotak merah
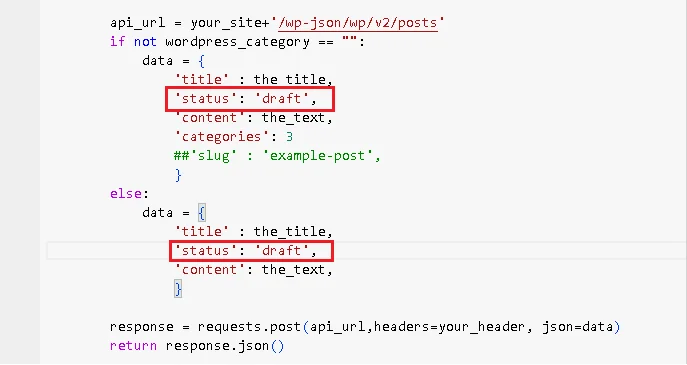
CTRL + F -> Ente ketik # SETTINGS -> ubah kotak tiap kotak merah

CTRL + F -> Ketikin time.sleep -> ubah kotak tiap kotak merah

Inget, sebelum ente ubah setting script auto post untuk kebutuhan keyword sama konten, pastiin dulu ente udah paham sama parameter kode yang udah ane jelasin.
Langkah 4: Otak-Atik Prompt ChatGPT
Kalo keyword sama konten udah ente setting dengan bener. Selanjutnya, ente perlu juga custom prompt ChatGPT biar konten yang ente generate pake script auto post bisa makin ciamik. Gini cara masukin custom prompt chatgpt.
CTRL + F -> Tinggal ketikin aja prefix atau #prefix -> ubah kotak tiap kotak merah

Nah, tinggal ente custom aja prompt chatgpt sesuai mau ente, biar konten yang di hasilin makin top markotop. Ane kasih contoh prompt nih.
I want you to play the role of (famous author name) and write an article in the style of (famous author name), with a minimum of 1000 words using headings and sub-headings. There must be a minimum of 5 headlines and 5 sub-headlines in the content in (change target language) for each available target keyword. Try to write at least 300-400 words of content for each headline or sub-headline.

Try to use contractions, idioms, transitional phrases, interjections, dangling modifiers, and avoid repetitive phrases and unnatural sentence structures.
When you write, you will properly format the blog post according to proper SEO standards and in the style of (famous author name), with HTML that is as rich and detailed as possible, for example, lists, bold, italics, quotes from the internet, tables, and external links to high-quality websites such as Wikipedia. Try to ask questions and give good, concise answers immediately, to try to achieve a featured snippet on Google.

The article should include an SEO meta-description (you should include the target keyword already in the description), an introduction, and a short click-worthy title. Also, use the main keyword as the first H2. Always use a combination of paragraphs, lists, and tables for a better reader experience. Write at least one paragraph with a title that matches the target keywords that are already available.

Make sure the article is free from plagiarism. Try to use the target keywords that are already available as much as 10% of the number of words in the article. Try to include the target keywords that are already available in the title as well. write content that can easily pass the AI detection tool test. And finally, don't use more than one H1 Title in the article.
Sebagai tambahan aja, jangan sampai ente lupa buat edit prompt ChatGPT seusai kebutuhan ente. Inget jangan sampai asal copas aja tanpa paham isi promptnya.
Baca Juga: ChatGPT Untuk SEO: 21 Cara Pemanfaatanya disertai Prompt
Maksimalin Hasil Generate Script Auto Post
Walaupun Script Auto Post ini udah bantu banget dalam mindahin konten, jangan lupa tetep perhatiin kualitas dan optimisasi SEO dari konten yang udah terhasilkan, ya!
Cek Sama Benerin Konten
Setelah scriptnya jalan dan konten tercipta, jangan lupa buat ngecek hasilnya. Lihat tata bahasa, ejaan, dan juga kelancaran bacanya. Kalo perlu, lakukan perbaikan buat pastiin kalo kontennya enak dibaca dan nggak kacau balau.
Jangan Lupa Kasih Gambar
Satu hal yang kurang dari script ini, yaitu nggak otomatis masukin gambar atau media lainnya. Jadi, ente mesti tambahin elemen visual ke konten sendiri. Pastiin gambar yang ente masukin cocok dengan topik dan udah di-optimasiin buat web.
Kelebihan dan Kekurangan Script Auto Post
Sebagai metode yang lumayan efektif, Script Auto Post ini punya kelebihan dan kekurangan yang perlu ente pertimbangin.
Kelebihan:
- Hemat Waktu: Proses posting konten otomatis bakal bantu ente ngirit waktu pas ngelola situs web.
- Nggak Bergantung Sama Plugin: Ente nggak perlu repot pasang plugin ekstra di WordPress buat lakuin tugas ini.
- Bisa Bikin Beragam Konten: Ente bisa bikin banyak konten dengan cepat, apalagi kalo ente masukin banyak keyword, makin oke.
Kekurangan:
- Gak Ada Gambar: Script ini nggak otomatis masukin gambar atau media lainnya, jadi ente harus lakuin sendiri.
- Konten Pendek: Artikel yang dihasilin cuman punya sedikit kata. Jadi, script autopost ini bakal lebih pas buat web yang udah punya nama, bukan buat web yang masih labil.
Baca Juga: Cara Blokir ChatGPT Untuk Menghindari Kanibal Konten
Kesimpulan
Nah, gimana? Sekarang ente udah pada tahu kan, cara gunain Script Auto Post? ente bisa dengan santai ngatur auto post konten dari ChatGPT ke WordPress pake Google Colab. Meskipun ada beberapa kekurangan, cara ini tetep efektif dan tentunya bikin ente ngirit waktu dalam ngelola situs web.
Jangan lupa buat selalu cek dan rapikan konten biar sesuai sama standar kualitas dan optimisasi SEO yang cakep, ya! Semoga penjelasan yang santai ini bisa bantu ente buat ngatur situs web jadi lebih keren dan otomatis tentunya!

